
The solar system is probably the coolest
part about the van conversion.
After three months I have not connected up
the split charger (the cables are just laying beside the battery should I need
to) and nor have I had to connect the van up to mains.

Solar power is AMAZING. This single panel
on the roof of my van easily gives two people ALL the electricity that we need
and want and, apart from the set-up, it is essentially free forever.
Solar
Basics
The solar system comprises of the following
key components;
- Solar panel
- Cables
- Solar Charge Controller
- Batteries
- Remote monitor
The solar power goes in to the panel, to
the solar charge controller – which intelligently distributes this power,
either to the battery, or to your appliances that you may be using.
The Solar Charge Controller (if you get a
good one) also does a few other clever things – like intelligent battery
charging, preventing over voltage and maximising the usable energy from your
panel.
Types
of panel
You could go into crazy amounts of
technical detais – but there are two main types; poly-crystaline and
mono-cyrstaline.
Honestly I did not care to research
enough in to the difference, I do not think there is enough of a difference to
worry about and, in reality, for your van conversion it does not matter too
much. Just get something with enough Wattage and from a reputable supplier.
This is my panel spec:
- Manufacturer: Perlight Energy
- Type: Mono-Crystaline
- Model number: INE 300MB-72
- Wattage: 300W
- 2m cable attached
- Pretty cool guarantees:
- 10 year manufacturing guarantee
- 12 year performance warranty of 90% of original power output
- 25 year performance warranty of 80% of original output
This panel is really designed to go
on a roof of a house. When I ordered it they assumed I wanted to order by the pallet load.. but when I said
I only needed one the supplier kindly posted one for about £30 postage.
You can get all sorts of different
panels; flexible glue on ones, a set of smaller panels for an array… but I like
simplicity and to have just one big panel works well in my mind. It cost about
£190 (including shipping).
How
big do I make the solar panel array?
Basically, based on the calculation of Watt
Hours of your power needs – just work out how many useable sunlight hours you
might have and divided the Watt Hours by that. This will give you what you need
for your solar system.
Sunlight
hours
|
5
|
hrs
|
|
Energy
required
|
533
|
Wh
|
<
Amount of output required per hour to deliver Watt Hours
|
Div
by sunlight hours
|
106.6
|
W
|
<Watts
delivered per hour - needed based on above sunlight hours
|
So technically I need a 100W panel to serve
my needs. However you sometimes get cloudy periods, end up parking under trees
and in winter, with shorter days and a lower sun – you get harvest less power.
On that basis I want my panel to deliver 3x
the above Wattage. Hence getting a 300W panel.
This means even if there is a week or so of
bad weather, where only 30% of the normal sunlight reaches the panel through
the cloud my batteries will stay nice and charged.
My
system
I have a single 300W solar panel on the
roof this is linked up to a 40Amp charge controller. I use 2x 140AmpHr
batteries.
Originally I bought a 10Amp charge controller
– but I was quickly getting an ‘over voltage’ warning. Over voltage is
essentially damaging to your batteries.
When I bought the charge controller I had
no idea that you have to get a charge controller that matches the Wattage of
your solar panel system. I didn’t realise there would be such a variation in
size for smaller systems.
Beware there are some cheap 'MPPT' solar charge controllers.. which just are not.
In Europe these brands have presence;
I am using this one; EP SOLAR Solar Charge Controller; 40 Amp MPPT
I think this is not a bad alternative. SOLAREPIC Solar Charge Controller, 40 Amp MPPT
In the US Morning Star, I think, are a pretty popular choice.
What
size Solar Charge Controller?
To work out the Ampage solar charge
controller you need you can use the following basic formula;
(Solar-Panel-Wattage / Voltage) x 1.25 = Charge controller Ampage
The ‘x 1.25’ bit is just a bit of margin
for safety.
For my system:
(300W / 12V)*1.25 = 31.25
I decided to just get a 40Amp charge controller.
Perhaps more than I need but at least I know for sure that it can easily handle
my panel and prevent potential over voltage.
Solar
Charge Controller type
There are two types, standard and MPPT. Go
for MPPT if you can afford it. If it is really cheap it is probably not MPPT –
there are a few chinese ‘mppt’ charge controllers which just aren’t.
MPPT (Maximum Power Point Tracking) Solar
Charge Controllers can be 25 to 30% more efficient. If you are getting a good
solar array – you might as well get a good charge controller to get the best
out of it.
You can also get a remote monitor so you
can see what is going on with the solar panel. It is not a need-to-have but it
is pretty cool to see what is going on. I recommend having one – they are not
too expensive either.
Note: the MT-50 as shown below did not seem
to work with the 10Amp EPSolar charge controller that I got in the first place
(it was too small anyway).

MT-50 Remote
monitor
Attaching
the panel to the roof
As part of my stealth agenda I wanted to
have the solar panel have a profile as low as possible.
My van came with these attachment point
rails along the sides – I cut these up to make a bracket. The bracket folds one
way – I probably will not need to use this feature – but it is useful to have –
and it means I am flexible when it comes to doing repairs to the panel.

I bolted the panel to the roof using four
6mm stainless steel bolts. Once tight, as the nuts would be behind my gladding
work, I used glue/sealant and spread it over and around the nut inside the van
to help keep it secure.

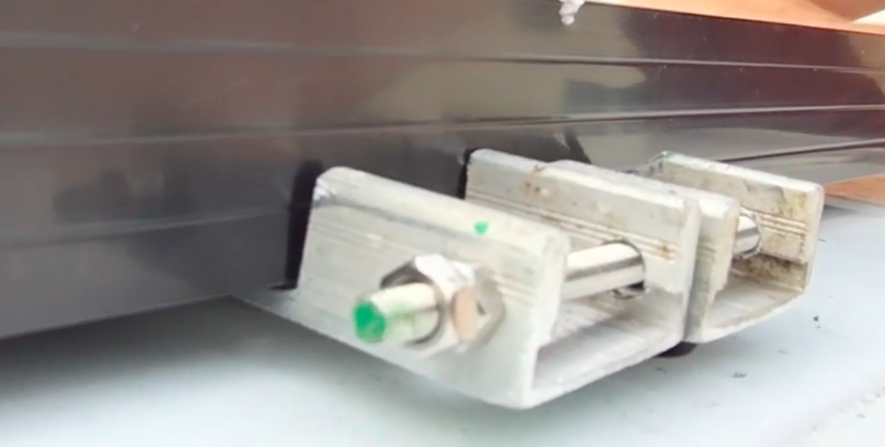
Hinge side – double nuts to make it more secure. I put
a couple of stainless washers between the two hinging ends.

Lift side (bolt holds bracket in place)
Bringing
the cables inside
I used a junction box with a hole cut in
the bottom to take the cables from the solar panel into the van. This actually
sits underneath the solar panel and I glued this on with ample amounts of sealant glue.
The cables follow down one of the areas I
left with a gap in the insulation.
Additional
Cables
I needed to buy a couple extra cables to
reach my solar charge controller. The cable type you will probably need to
search for is '

MC4 connectors

Great write-up of your system!
ReplyDeleteyour van looks great, you did a great job motivate me to work !
ReplyDeleteGreat post and very detailed. Do you have problems when you're driving down the road with it?
ReplyDeleteNo - its been great so far. I checked the bolts and they are all still super tight.
DeleteI didn't see any special tools needed that were mentioned. I was thinking about doing a small writeup/tutorial about this on my website about tools and was wondering if any special tools were required (drills, electrical tools, etc.). Thanks for the idea!
ReplyDeleteI have put a list of tools in the latest blog post! :)
DeleteGreat post. Thanks for sharing. SolarEnergyXpert offers reliable and affordable solar panels installation in California. Visit us to get free solar consultation today.
ReplyDeleteSolar panel works better if you have any roof coating berceuse they are energy efficient. Roof Repair Contractors is good enough to support your solar system with strong roof.
ReplyDeleteGreen Cloud is one of the pioneer solar panels company in the Pakistan. We offer best Solar Energy Solution and Solar System for the Residential and Commercial usages. We make it easy and affordable. Green Cloud Offer High Quality Top branded Best Solar System Price in Pakistan , Further information visit website www.greencloud.pk
ReplyDeletethanks for sharing such a nice post!
ReplyDeleteIt is very informative & will be useful for those who are interested
in Solar Panel Installation.
Inviro Solutions Group
Really nice blog!! I am glad to read your post, pretty informative.
ReplyDeleteSolar Albuquerque
Solar Albuquerque
Really nice blog!! I am glad to read your post, pretty informative.
ReplyDeleteSolar Las Vegas
Solar Las Vegas
This comment has been removed by the author.
ReplyDeleteGreat stuff on off grid solar system. Thanks for sharing it. I found some informative stuff on Commercial solar systems & Solar power solution. Click on it and read it.
ReplyDeleteFantastic blog and very interesting all information of the blog.
ReplyDeleteI liked your blog.
off grid inverter
This comment has been removed by the author.
ReplyDeleteSolar power is one free source of energy that we can use all day, every day. Solar Energy System is the smartest way to power your house today. With the price of solar panels being very competitively priced, government incentives and advances in solar energy technologies, it makes much more sense to consider solar today.
ReplyDeleteNice Post is this!Driver Ed Coupon
ReplyDelete